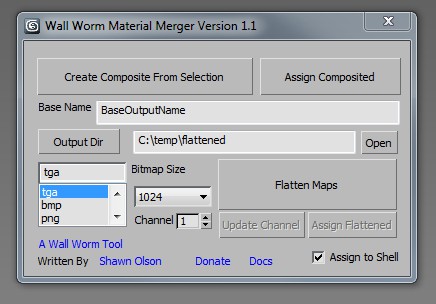
Material Merger
This MAXScript utility allows you to flatten all the materials of all selected objects into a single material where all shared map channels of the original materials are composited and flattened into single maps in the final material. It's a utility for use inside 3ds Max.
Even though there are some solutions already out there, I wrote this tool to handle my own personal preference with dealing with the problems presented by the limitations of RTT. For alternate and related tools, see bottom of page.
Installation
This tool will be included in an upcoming version of Wall Worm. But you can also download it individually here.
- Download Wall Worm Material Merger
- Place it into your Scripts folder
- Run the script by clicking MAXScript > Run Script and browsing to the file wallworm_material_merge.ms.
Usage
Steps prefixed with * are optional and are dependant on your material/model setup.
- Select any object or group of objects that have materials rendered out into the same UVW space. For example, if you have a group of buildings that each have their own materials but are sharing the same instanced Unwrap UVW modifier, they can be used for this tool.
- *While all objects are selected, Render to Texture all of the materials.
- Open Wall Worm Material Merge (either through Wall Worm or via the MAXScript > Run Script and choosing wallworm_material_merge.ms).
- Click Create Composite From Selection. This will create a Material where all your materials have been reduced into one material where all the maps are now layers in a Composite map.
- Choose a Base Name for your output bitmaps. A good idea would be something that related to the model or collection of models.
- Choose the output path for the bitmaps.
- Select the appropriate bitmap file type. The default is TGA.
- Choose the output bitmap filesize. The default is 1024.
- Select the appropriate UVW Channel.
- Click Flatten Maps. Now there will be bitmaps in the target output directory. NOTE: this will overwrite bitmaps you already made for any previous materials that used the same base name and output directory!
- * Select the originally selected objects and click Assign Flattened to give the objects the new flattened material.
Tips and Hints
- The following list of materials are supported:
- Standard
- Mult/Sub-Object
- Shell
- DirectX_Shader
- When using objects with the material types listed above, the used materials will always be a Standard Material. The standard material used for Shell will be collected from the Baked Material and the one used for a DirectX_Shader will be the Render Material. The function collects these materials recursively.
- When you flatten maps, you need to make sure that you assign the correct UVW channel used in your object(s). You do that with the Channel spinner before* you press Flatten Maps. If you do not do this and apply the material to objects with the Assign Flattened button, the materials will display improperly.
- If you forgot to set the correct UVW channel, you can change the channel spinner to the correct channel and then click Update Channel.
- As with most of my tools, most buttons and UI input fields have tool tips if you hover your mouse over them.
- This tool was integrated into Wall Worm 1.852. After updating Wall Worm and running any WW function, you will then find it in the updated menu under Wall Worm > Wall Worm Utilities > Material Merger.
Changelog
Version 1.2
- Added Material Shader Type menu to choose the output material Shader Type.
- Added more texture maps to look for.
- Added experimental support for VRay Materials.
- Added minor error checking logic.
Version 1.1
- Added Open button to open the output directory.
- Updated the Channel spinner to get remembered between sessions.
- Updated file writing to allow for base names with slashes... the output files will get put into subfolders.
- Changed naming of materials. Now the flattened material will match exactly the Base Name.
- Bitmap nodes now also get the Base Name as the node name.
- Added Shell checkbox. When checked, the Assign Flattened button will preserve the exisitng selections' materials but move them into the original material of a Shell Material. The flattened material is assigned to the shell material's Baked Material slot.
Version 1.0
- Initial Release
Related Links and Tools
There are already some utilities out there that do some of the things this tool does. Here are some of them along with related, relevant other tools.
Tools with similar functionality:
Tools of interest:
- Material Scripts
3ds Max material scripts.
- Wall Worm Auto Material
- Material Merger
- Related Topics


Comment awaiting approval.
Toby O'Brien
Jul 22, 2016
Reply
Shawn Olson
Aug 8, 2016
Reply
Toby
Aug 15, 2016
Reply
Shawn Olson
Jan 5, 2013
Reply